Anatomy of a QR Code — What Every Part Does (With Diagram)
4 min readqr-codes, technology, guide
Most people scan a QR code two or three times a day — at a restaurant table, on a poster, on a package — without ever thinking about what's inside. Every black-and-white square has a purpose, and once you can name them, you start designing QR codes that work instead of QR codes that might work.
Here's the guide. Save it, send it to your designer, or print it out.
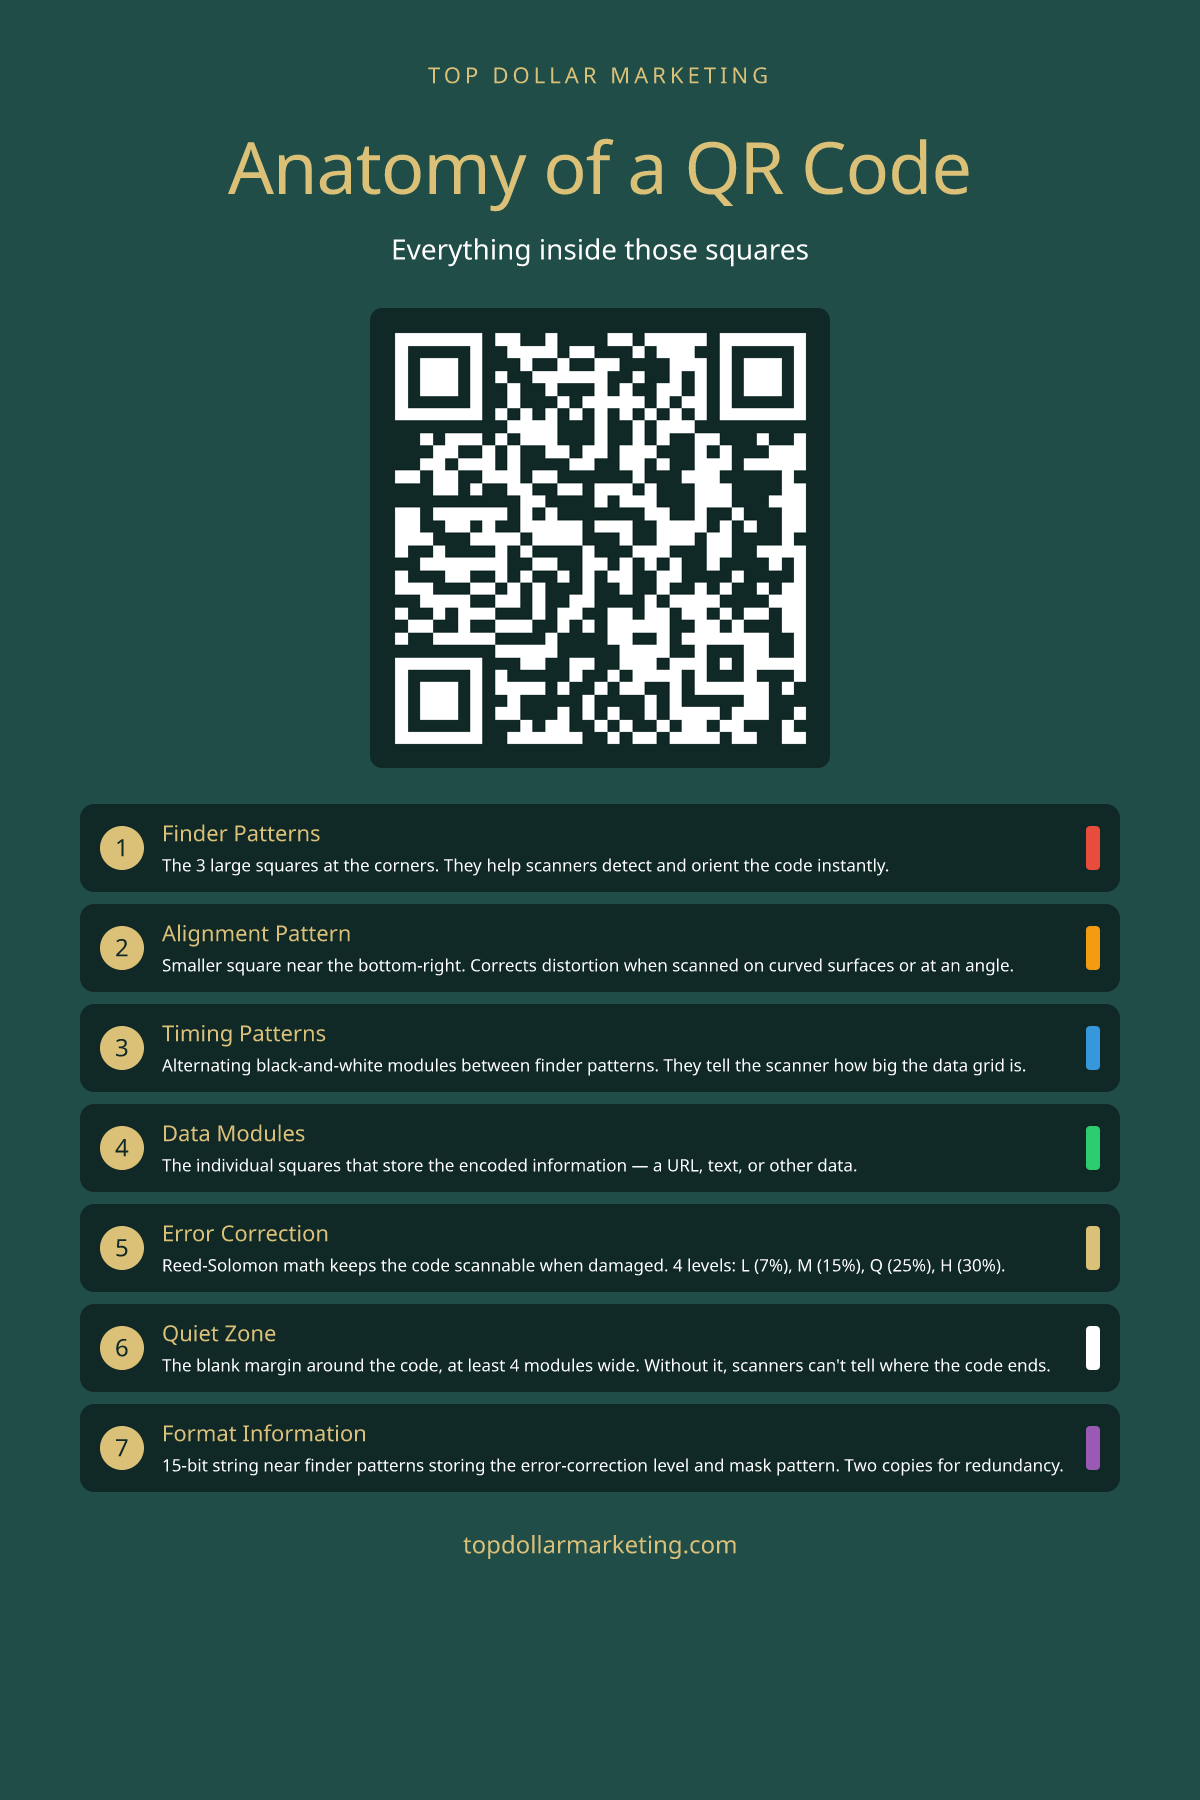
The 7 key components of a QR code. Each serves a specific purpose in ensuring reliable scanning.
1. Finder Patterns
The three large squares at three corners are the most recognizable part of any QR code. They're called finder patterns, and their job is to tell a camera "this is a QR code, oriented like this" in a fraction of a second. The reason all three corners have them (instead of just one) is so the scanner can detect orientation regardless of how the code is rotated — upside down, sideways, mirrored.
The finder pattern is also why QR codes were invented in the first place. Denso Wave designed them in 1994 for tracking automotive parts on a production line. Barcodes were too slow because cameras had to align them precisely. Finder patterns let a camera lock on instantly, from any angle.
2. Alignment Pattern
The smaller square near the bottom-right corner is the alignment pattern. It only appears on QR codes Version 2 and above (Version 1, the smallest, doesn't need one). Its job is to correct distortion — when you scan a QR code on a curved bottle, a wrinkled poster, or at a steep angle, the alignment pattern lets the decoder warp the grid back into a perfect square.
This is why larger QR codes (which encode more data) have multiple alignment patterns spread across them. Bigger codes mean bigger areas where distortion accumulates, so they need more reference points.
3. Timing Patterns
Between the finder patterns, there's a single row and a single column of alternating black-and-white modules. That's the timing pattern. It tells the decoder how many modules fit between the finders — which determines the grid size of the whole code.
Without timing patterns, a partial print blur or a sticker over the code could throw off the entire decode. With them, the scanner always knows how big each module is supposed to be.
4. Data Modules
Most of the QR code is data modules — the individual black and white squares that actually encode the information. A Version 1 QR code is 21×21 modules and can hold up to 25 alphanumeric characters. Version 40 is 177×177 and holds nearly 4,300 alphanumeric characters.
The data is encoded in a specific zigzag pattern starting from the bottom-right, snaking up and down through the grid. Bytes are organized into Reed-Solomon error correction blocks — which brings us to the magical part.
5. Error Correction
You can damage a QR code — scratch it, fold it, even cover up to 30% of it — and a scanner can still read the original data. That's the Reed-Solomon error correction algorithm at work, the same math that lets a CD survive a fingerprint or a satellite transmission survive cosmic interference.
There are four error-correction levels:
- L (Low): 7% of the code can be damaged
- M (Medium): 15% (the default for most generators)
- Q (Quartile): 25%
- H (High): 30%
Higher correction means more redundancy, which means less space for actual data — so a Level H code holds about half as much data as a Level L code of the same version. The reason you can put a logo in the middle of a QR code is error correction: the logo destroys some data, and the redundancy fills the gap.
6. Quiet Zone
The blank border around the code — at least 4 modules wide — is called the quiet zone. It's not decorative. Without it, the scanner literally can't tell where the code ends and the rest of the world begins.
This is the single most common QR code mistake. Designers crop QR codes flush against a background, or place them inside a colored frame, or set them on a busy pattern. The code looks fine to a human, but the scanner refuses to lock on.
Rule: always leave white space (or whatever your background color is) around the code, at least 4 module-widths wide.
7. Format Information
Near the finder patterns, there are two short strips of modules — 15 bits each — that store the format information. This is metadata about the code itself: which error correction level it uses, and which "mask pattern" was applied to the data area to balance the ratio of black to white modules.
There are two copies of the format information (top and bottom of the upper-left finder), so even if one is damaged, the other still tells the scanner how to decode.
The Practical Takeaway
Three things matter when you're making a QR code for real:
- Leave the quiet zone clear. Don't crop tight. 4 modules of breathing room minimum.
- Use error correction Level H if you want to add a logo. Without it, the logo destroys data; with it, the code still scans.
- Test on multiple phones before printing 10,000 flyers. What scans on iPhone 15 might not scan on a 5-year-old Android with a scratched lens.
Create your own QR code with our free generator → Customize colors, add your logo, and download in PNG, SVG, or EPS.